Wednesday, June 6, 2012

USB PIC Programmer


New Design - Updated 4/23/2013

Stocks coming this January 2014!
Redesigned the programmer due to fail in design.
Programmer will still come this January.

PIC tutorial coming in 2014!

New design of case with firmware update, so you can enjoy the newer software version. This will be the final design (as long as the USBPICPROG won't change the hardware design).

Software and "How to use" will be much the same, as I just limited the previous programmer to avoid firmware update and stick to one firmware/software version only.
Availability of the item will be on last week of May.
How to update firmware, to follow.


Older versions of PIC Programmer (see image below this post) can't upgrade the firmware, please stick to version 0.4.2

Welcome
To install software, please use the above navigation links according to your operating system.
Quick navigation on the right can help how to use the programmer and the software.

Thank you for supporting USB PIC Programmer.
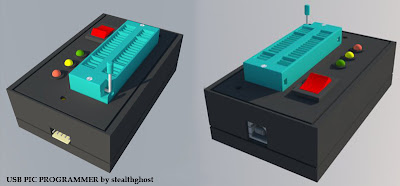
PIC Programmer circuit used in this site was created by Frans Schreuder. 

PIC to Programmer

PIC to Programmer

  1. Check your PIC's datasheet online.
    • You can search your datasheet through here.
  2. Find the following pins on the datasheet as specified here.
  3. Be sure to toggle the switch according to the number of pins of your PIC
  4. Position your PIC on the ZIF (Zero Insertion Force) according to the picture below.

  5. 18-pin PICs
    20-pin PICs
    28-pin PICs
    40-pin PICs

  6. To load HEX to your PIC, click here

  • PIC10F200
  • PIC10F202
  • PIC10F204
  • PIC10F206
  • PIC12F629
  • PIC12F635
  • PIC12F683
  • PIC12F675
  • PIC16F628
  • PIC16F628
  • PIC16F630
  • PIC16F648
  • PIC16F676
  • PIC16F684
  • PIC16F687
  • PIC16F818
  • PIC16F819
  • PIC16F84A
  • PIC16F870
  • PIC16F873A
  • PIC16F874A
  • PIC16F876A
  • PIC16F877
  • PIC16F877A
  • PIC16F88
  • PIC16F882
  • PIC16F883
  • PIC16F886
  • PIC16F887
  • PIC18F252
  • PIC18F452
  • PIC18F458
  • PIC18F24J10
  • PIC18F2450
  • PIC18F2455
  • PIC18F25J10
  • PIC18F2550
  • PIC18F2553
  • PIC18F44J10
  • PIC18F4455
  • PIC18F45J10
  • PIC18F4520
  • PIC18F4550
  • PIC18F8525

ICSP Connection

ICSP Connection


In Circuit Serial Programming (ICSP) is the most common way to connect the programmer to the target PIC. This way, a 5-pin header has to be connected to the corresponding pins on the target board, having the following connections:


Pin on Programmer Description
VPP The programming voltage, 12V = programming, 5V = run, 0V = reset
VDD 5V power supply, can be left open if the target is self-powered.
PGD Programming Data pin
PGC Programming Clock pin
GND Ground pin, 0V

The image below shows the ICSP connection sequence of the programmer according to the hardware design.
If you design your own PCB or create on breadboard, found here, you must follow the sequence accordingly to successfully program your intended PICs.
(Note:On different programmers such as PICKIT2 or Junebug, the arrangement are different. These five pins are the basic requirement in programming PICs)

Using the Software

Using the Software

  1. Make sure you've install the software according to your OS.
  2. Plug in your programmer and open the software.
  3. The program will automatically detect your programmer.


    • In case you haven't plugged in your programmer
    • Select Actions > Connect


  4. Assuming you have connected the PIC to your programmer (click here if you haven't).
    • Select Actions>Autodetect


  5. Your PIC should be detected as shown below


    • You may choose your PIC model as well
    • Autodetect is a better method.

Using Breadboard & ICSP

Using Breadboard & ICSP


Purchase a 40-pin male header from any electronic stores.
Cut 5 pins and set aside the remaining 35 pins.
Push the pins upward/downward by holding the black plastic until it is half.
Put the PIC and the pushed 5-pin header on the breadboard.
Create a connection from the 5-pin header to the PIC according to required PINS.
You can now connect your programmer to your breadboard.
You can also use solid wires to connect to your PICs instead of the 5-pin header stated above.)

Loading HEX File

Loading HEX Files

  1. Go to File>Open and locate your HEX file and press open.
  2. Press F7 to program your HEX to your PIC, or go to Actions>Program
  3. Wait for it to finish loading your HEX file.

Check out Using the Software for additional information.